Leute dachten sich, das gute alte PONG hat eine Dimension zu viel und haben ein eindimensionales PONG gebaut. Mit nem LED-Streifen und einem Knopf auf jeder Seite, den der jeweilige Spieler drücken muss, wenn der Ball (also die leuchtende LED) auf seiner Seite ist.
Ich finde immer noch, das ist eine Dimension zu viel!
Am einfachsten ist es, sich vorzustellen, auf einen 1D-PONG-LED-Streifen von der Seite zu gucken - man sieht also nur ein Licht, das sich entfernt oder näher kommt. Das wird mittels PWM (Pulsweitenmodulation) realisiert, wodurch die LED fürs Auge heller und dunkler zu werden scheint.
Die Sache hat einen Haken: Es ist sehr einfach, zu erkennen, wenn die LED aus ist, aber sehr schwer, zu erkennen, wenn sie ganz an ist. Sie könnte ja noch heller werden...
Die Lösung ist, zwei LEDs zu haben, die im jeweiligen Wechsel an- und ausgehen, sodass eine immer heller, die andere gleichzeitig immer dunkler zu werden scheint. Man kann damit also schummeln, indem man auf die LED-Farbe seines Gegners guckt und drückt, wenn diese ganz aus ist.
Mein Pulsweiten-Code hat 256 Granularitäten, exakt zum Zeitpunkt 0 oder 255 zu drücken dürfte ziemlich schwierig sein, also habe ich doppelt gestaffelte Schwierigkeitsgrade ersonnen:
- Der Zeitraum, wann man drücken kann und der Ball als getroffen gilt (Größe des Paddles)
- Die Geschwindigkeit, mit der sich der Ball bewegt.
- Soll der Ball während des Spiels schneller werden oder soll die Geschwindigkeit abhängig davon sein, wann man ihn trifft? (Ob ich die Y-Achse oder die Zeitachse auf die Zeitachse mappe)
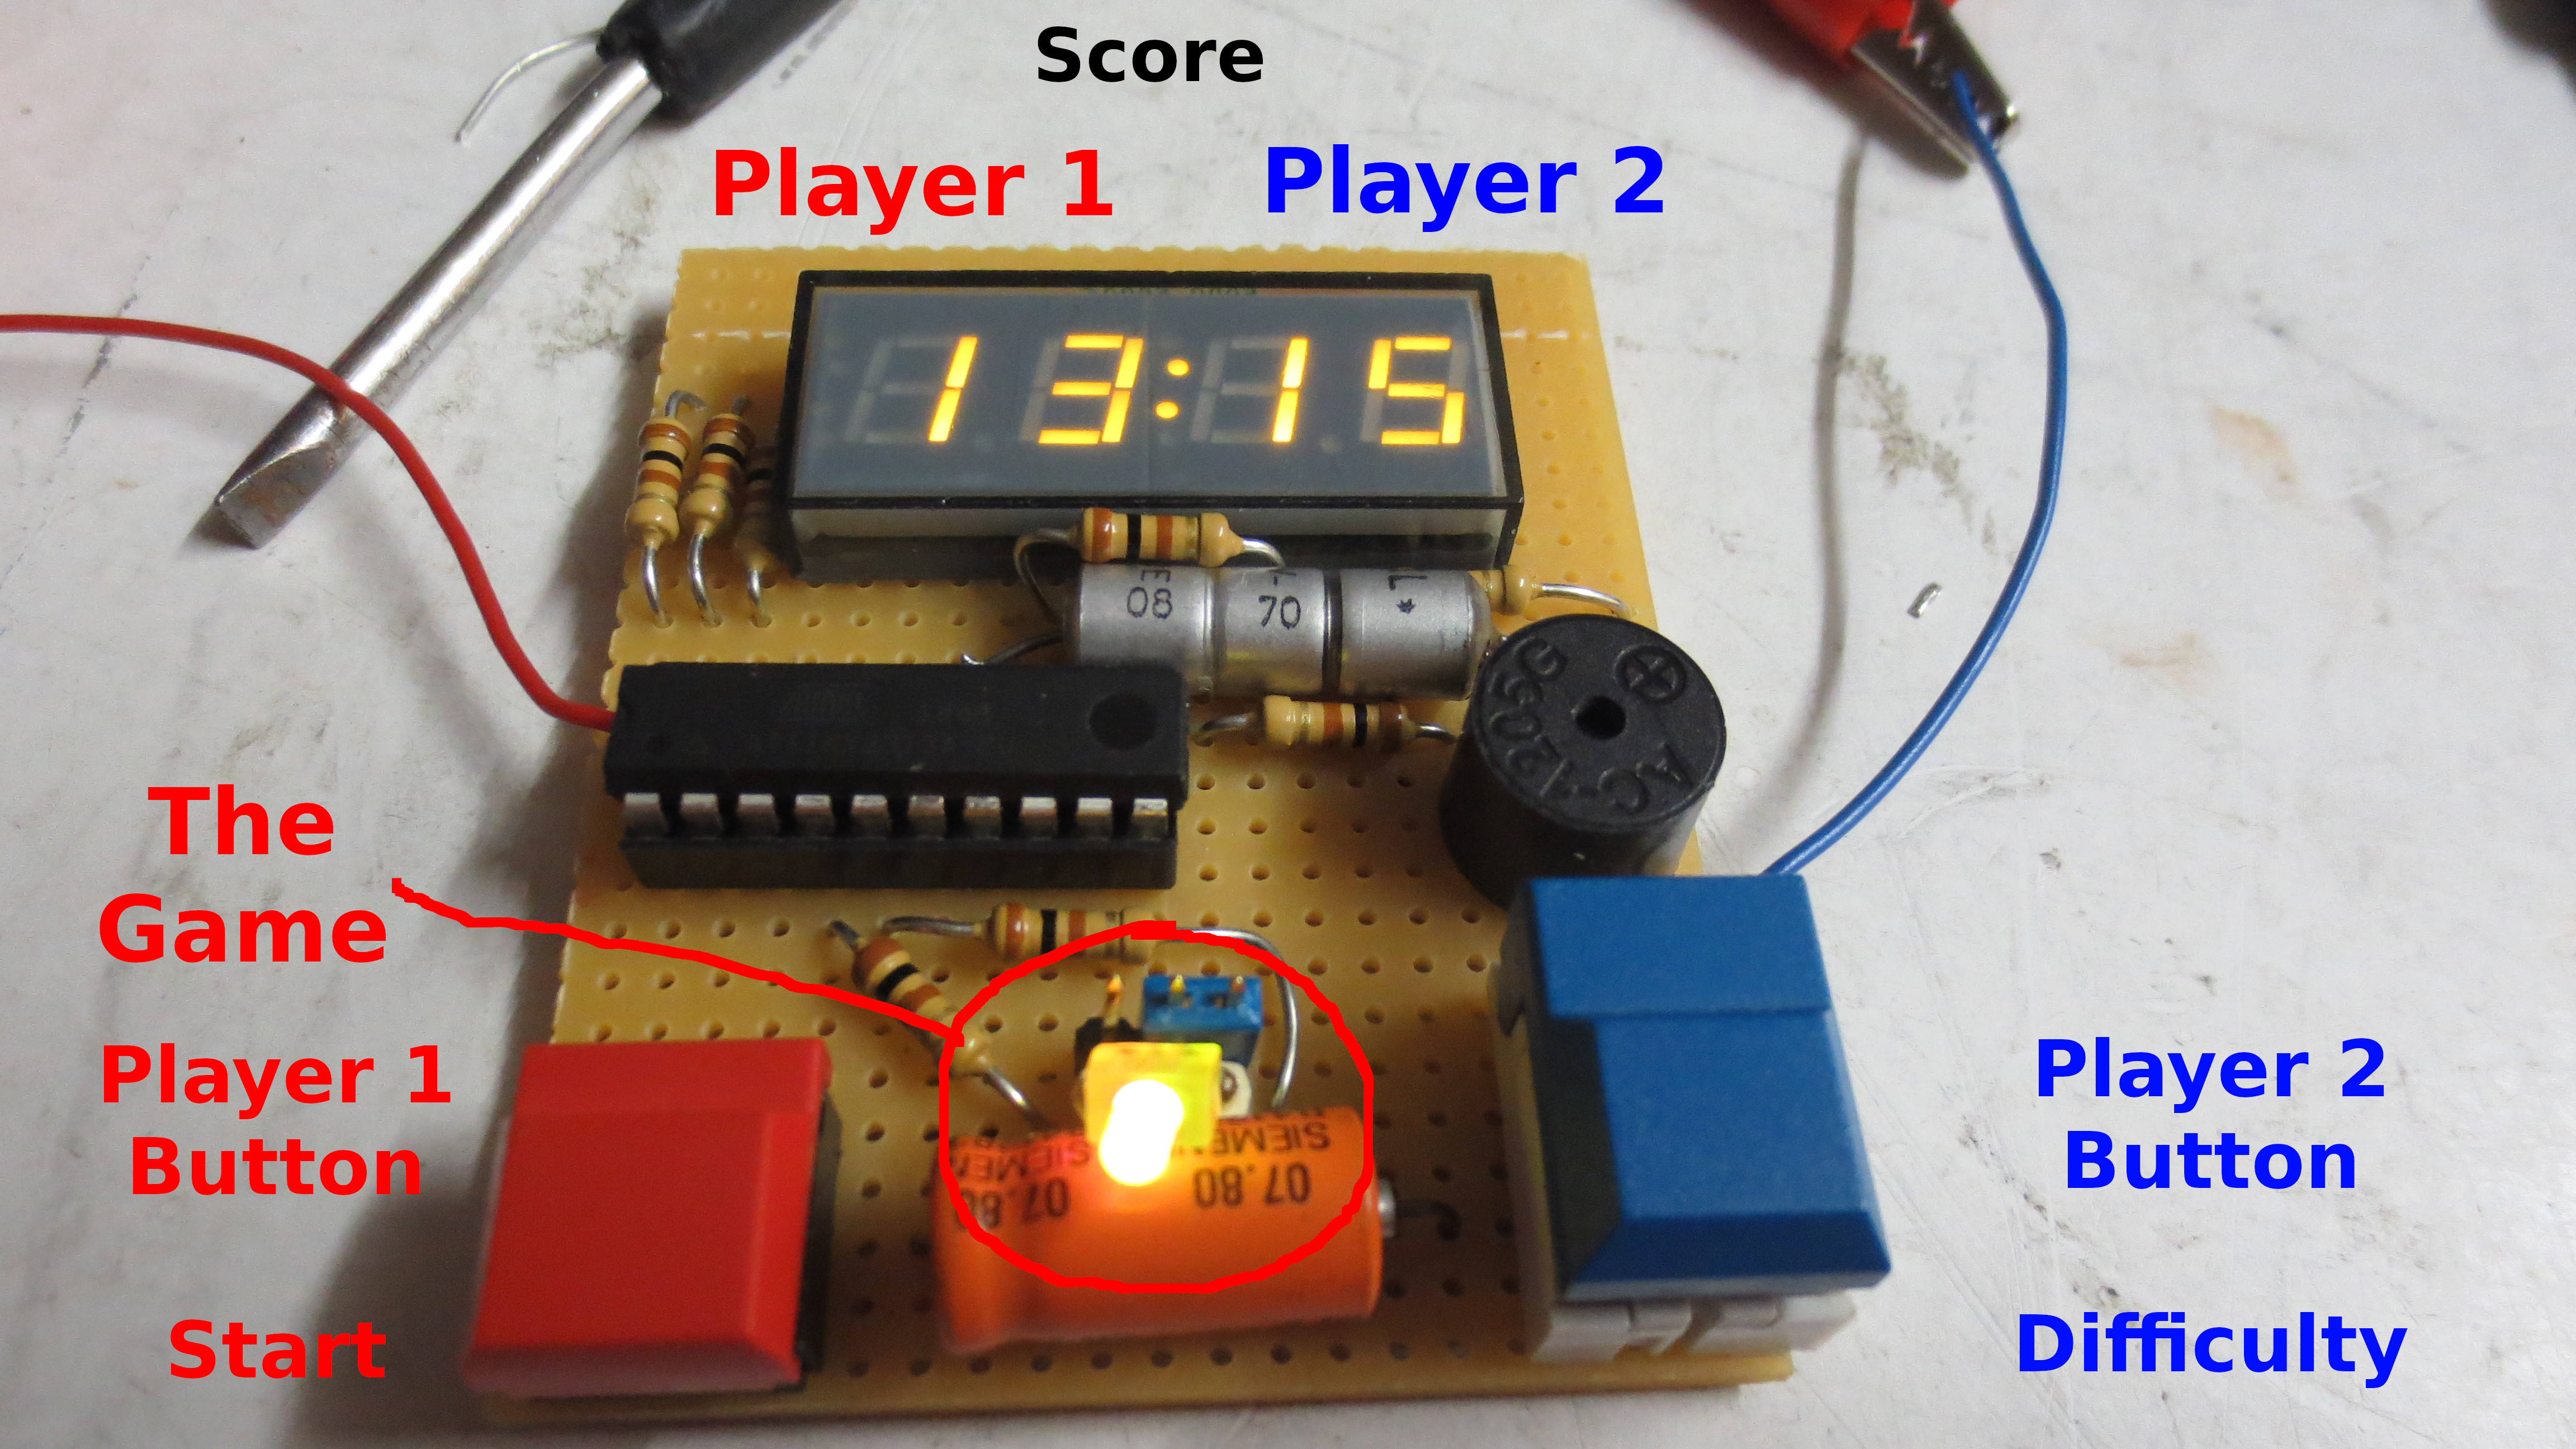
Schaltet man es ein, erscheint zuerst die Abfrage des Schwierigkeitsgrads ("d" im Display).
Bei geraden Zahlen wird alle 4 Schläge der Ball schneller (und ich hab vergessen, die Geschwindigkeit bei einem Tor zurückzusetzen, der Fix ist auskommentiert in Zeilen 206 und 216, ungetestet, einkommentieren auf eigene Gefahr), bei ungeraden Zahlen ist die Ballgeschwindigkeit vom Zeitpunkt des Treffens des Balles abhängig.
Mit dem rechten Button stellt man ihn ein, mit dem linken startet man das Spiel.
Anschließend zeigt das Display die Score Spieler1:Spieler2 an. Es geht bis 15 Punkte, genau wie das richtige PONG.
Blinking an LED with an Arduino - advanced edition.
People thought, good old PONG has one dimension too many and made one-dimensional PONG. That's usually an LED strip with a button at each end that each player has to press exactly when the ball (lit LED) is on his end.
Now I'm still thinking that's one dimension too many!
The easiest way is to imagine a 1D-PONG LED strip, viewed from the side so that you can only see a light that comes closer and goes further away. That can be easily implemented using PWM (Pulse Width Modulation) which makes the LED seem to change brightness when in reality it's just flickering crazy fast.
There's a catch though: It's easy to see when the LED is off. It's really hard to see when the LED is at maximum brightness. It could always go brighter...
The solution is having two LEDs that are lit concurrently so that while one appears to get brighter, the other appears to get dimmer. So you can cheat by checking when your opponent's LED is off.
My PWM code has 256 granularities, so pushing the button exactly when the brightness is at 0 or 255 is very nearly impossible, so I made up some levels of difficulty.
- The window of time where you can push the button and it counts as a hit (size of the paddle)
- The speed the ball moves at
- Should the ball go faster during gameplay or should the speed depend on how close to the end stop you hit it? (should I map the Y-axis or the time axis to the time axis)
When you turn it on, it first asks for the difficulty setting ("d") on display.
On even numbers, the ball gradually gets faster every 4 hits. (and I forgot to reset it in the code - I put the fix in a comment in two places - lines 206 and 216, untested, uncomment at your own risk).
On odd numbers, the speed of the ball depends on when you hit it.
Right button changes difficulty, left button starts a game.
Afterwards, the display shows P1:P2 score. It goes up to 15 points, just like the original PONG.
Well pretty much everything is in the source code, but who has the time to read my weird novels of comments?
Target is the Attiny2313, with some adaptation you should get it to run on pretty much every 8 bit Atmel platform.
PA0 und PA1 (Pin 4 and 5) go to the LED(s). A two-legged bicolor LED can be hooked straight up to pins 4 and 5, a three-legged bicolor LED needs either ground or 5V in the middle. And of course properly dimensioned resistors.
The buttons go to the two hardware interrupt pins (PD2, PD3 - pins 6 and 7).
The buzzer is optional, it goes through a capacitor (I used 1uF) to OC1A (Pin 15).
The display is also optional, the digits go left to right to pins 2,3,8 and 9 and the segments go from a-g to pins 12,13,14,16,17,18,19. I'm using a common anode display that has a colon for segment d of the first digit and a decimal point (which is VERY optional) on segment a of the first digit.